While our solar system has been (mostly) up and running for some time, we have needed to make a better way to attach the panel to the roofrack than zipties.Sadly there was no way to buy something off-the-shelf here as we wanted to be able to install the panel semi=permanently on the rack but still be able to remove and setup away from the bus as needed (picture that your camping in the desert but parked in the shade...cold drinks might still be a good idea). Anyway, we created the system to plug-and-play with either a 6' cord or a 30' cord, so all we had to do was figure a way to attach the panel that allowed both security and removal. All made more difficult by the fact that any additional holes dried or screwed into the factory frame void the all important warranty for the panel. of course. Finally got around to this tricky engineering project:
The panel sits nicely along one side of the rack, allowing for the spare tire in front, jerry cans behind (a good idea on any trip since our fuel gauge doesn't work), and hopefully enough space for surfboards along its right side. I have been using aluminum extrusions and have been really happy with how clean these fabs turn out. See my first project, the jerry can holder here.
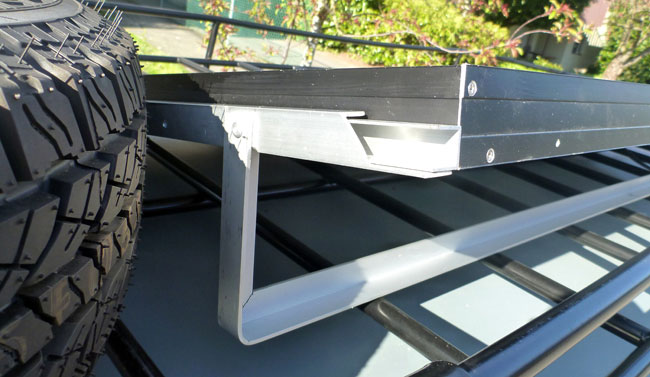
In this case, we started with a simple set of U-channel tracks on each side of the panel that slide into a frame made of a slightly larger U-channels to hold the panel in place but allow smooth sliding action.
The problem then becomes getting the panel out of the rack. No easy feat when already working overhead with a panel that stretches wider than the average wingspan. We attached the panel to the rack by riveting a piano hinge to the panel and using a set of rubber coated C-clamps that wrap around the bars that form the base of the rack.
The front of the frame folds down to become a leg that holds the panel on an angle just enough to clear the siderail of the rack and allows us to easily slide the panel out and setup in direct sun. Here's the frame while closed and laying flat in the rack: And with the front dropped down to stand the frame up for removing the panel:
 A better shot of the U-channels the create the slide for removing the panel.
 Everything seems to be functioning smoothly for now, and we simply need to find a place to attach a lock around the frame to the rack.
As with any project, I'll be curious to see how these weather over extended use. I fear the first point of failure with be from a bad reaction leading to rust between the aluminum rivets and the piano hinge. time will tell.